Go Kart ECU
The ECU was built in order to monitor variables in the engine such as temprature, revs, speed etc. It was programmed on an Arduino nano to keep it compact as it was being mounted in a small 3D printed box on the wheel.
I used C++ and the Arduino IDE to write and upload the programs
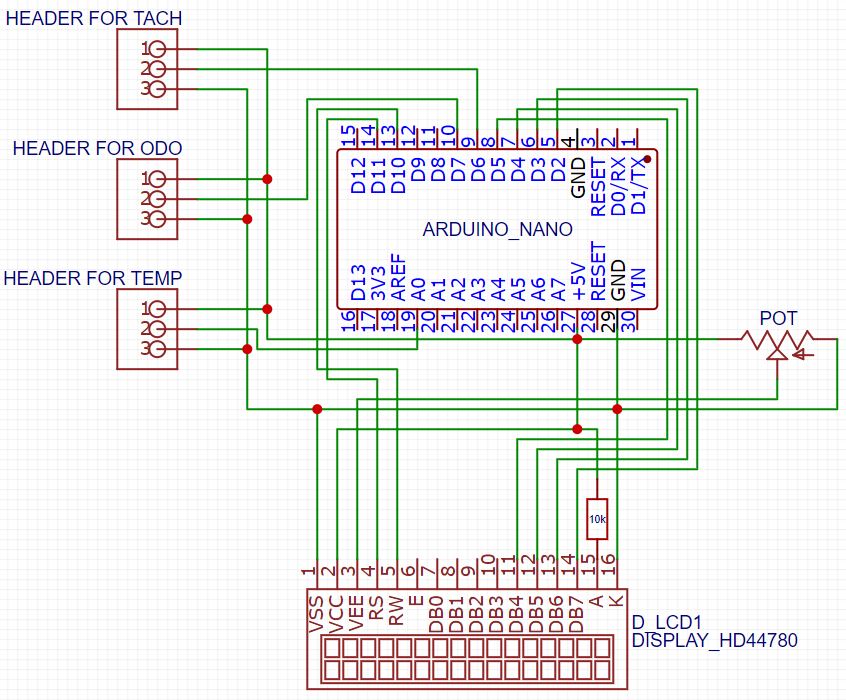
Board Layout
Speedometer
The speedometer is used for calculating the speed of the kart, I wanted this to be as accurate as possible while having limited space to work with. The best and simplest solution for this is by attaching a magnet to the rear wheel and a hall effect sensor to the back axel, the hall effect will allow us to detect every time the magnet does a full rotation.
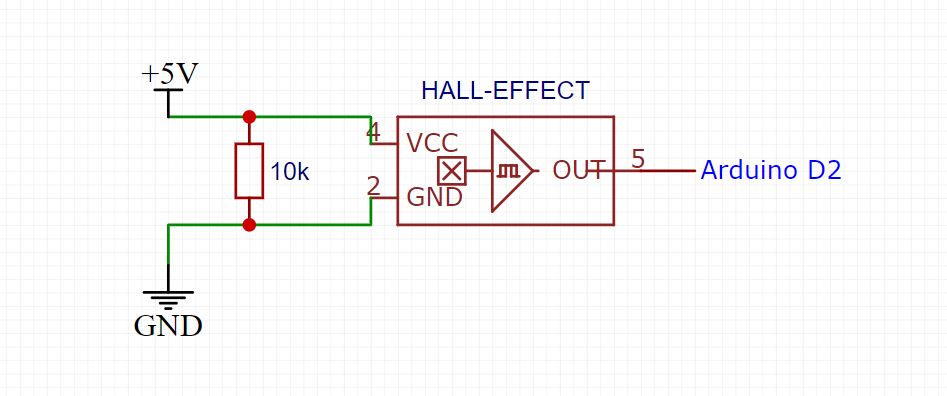
I setup the hall effect to count how many times the magnet passes and update every 250ms for accuracy, I used the ‘attachInterrupt()’ function to read everytime it passes and calculate the rotations per second (RPS). Once you know this value and the radius of the wheel the magnet is spinning on you can caluclate the miles per hour (MPH).
This is the relevant code:
volatile unsigned int count = 0;
unsigned long next = 250;
unsigned int temp = 0;
const int radius = 10;

unsigned int rps = 0;
unsigned int fph = 0;
unsigned int mph = 0;

void setup() {
  Serial.begin(115200);
  attachInterrupt(digitalPinToInterrupt(13), magnet_detect, RISING);
}

void loop() {
if (millis()>=next){
    temp = count;
    rps = temp * 4;
    fph = 2 * 3.14159 * radius * rps * 60;
    mph = fph / 5280;
    Serial.print(mph);Serial.println("mph");

    count -= temp;
    next += 250;
}

void magnet_detect()
{
  count++;
}
fph = Feet per Hour
Tachometer
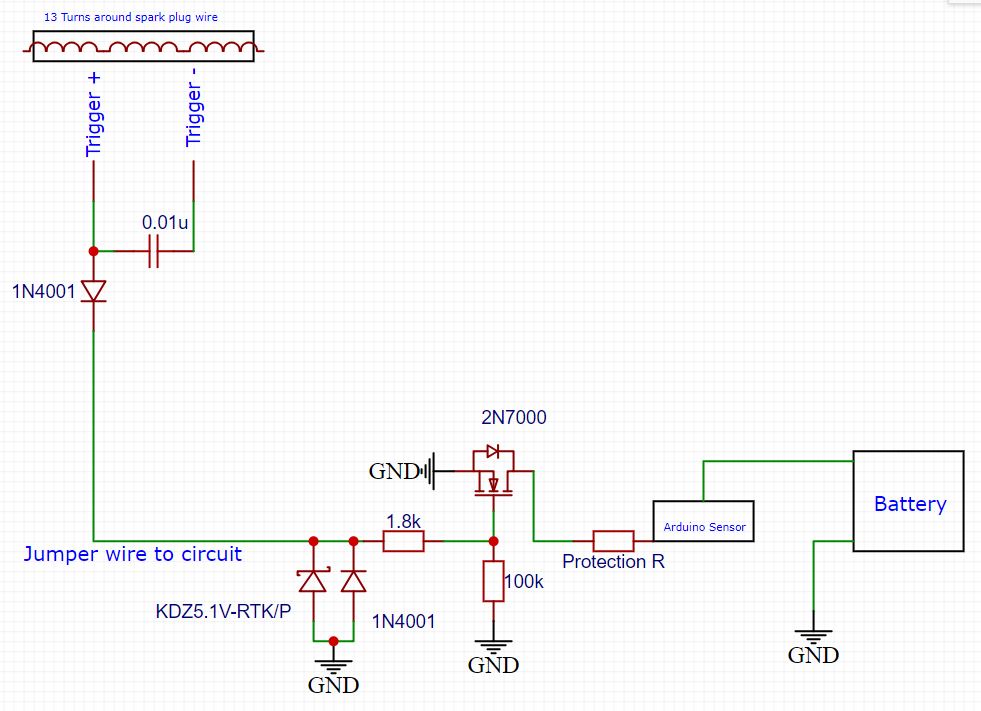
The tachometer is used to measure the amount of revolutions the engine does, this means it can be a lot harder to actually measure it without having something built into the engine especially on a 2-stroke. In order to measure every rotation of the engine we can look at the spark plug. Spark plugs ignite the mixture of air and fuel within the engine which happens every rotation, The cable to the spark plug send a voltage along it in order to light the mixture.
In order to read this signal I wound a wire around this cable to induce a voltage of it, much how a timing light works. So i built a circuit to reduce the noise and magnitude of induced voltage and wired it into the arduino, this will then allow you to convert it into RPM.
The display this on the LCD i made the top row on show a solid block across for how fast the engine was turning.
#include <LiquidCrystal.h>

int sensorRev = 8;
volatile unsigned int rev_count = 0;

byte fullBlock[8] = {
  B11111,
  B11111,
  B11111,
  B11111,
  B11111,
  B11111,
  B11111,
  B11111 //this code tells the LCD exactly what 'pixels' to display when fullBlock is called
};

void setup() {
  attachInterrupt(digitalPinToInterrupt(9), rev_detect, RISING);

  lcd.begin(16, 2);
  lcd.clear();
  lcd.setCursor(0, 0);
  lcd.createChar(0, fullBlock); //this creates the character variable byte for fullBlock
}

void loop() {
  rev_bar();
}

void rev_bar(){
  int revs = digitalRead(sensorRev);
  int bars = round(revs / 625);
  if (bars > 16) bars = 16;

  lcd.print("                ");
  lcd.setCursor(0, 0);
  for (int i = 0; i < bars; i++) {
    lcd.write((byte)0);
  }
}
void rev_detect()
{
  rev_count++;
}
This essentially takes whatever the max rev limit of the engine which is estimated around 10,000 RPM. By taking 10,000 and diving by the amount of character spaces on the LCD (16), you can find out each parameter for how many bars to display at that RPM. Then simply just draw the correct amount by iterating and writing the byte variable to the LCD.
Engine Temperature
To detect the engine temprature I used a K-Type Thermocouple because i needed something to withstand high tempratures, i simply wired this into a module board and straight into the pins on the Arduino.
I used to following code to translate it into an float value i could display on the LCD:
#include <Adafruit_MAX31855.h>

#define CLK_PIN   9
#define CS_PIN    7
#define DO_PIN    8

Adafruit_MAX31855 thermocouple(CLK_PIN, CS_PIN, DO_PIN);

void loop() {
  float temperature = thermocouple.readCelsius(); // Read the temperature in Celsius

  Serial.print("Temperature: ");
  Serial.print(temperature);
  Serial.println(" °C");

  delay(1000);  // Adjust the delay as needed
}